Although it doesn’t sound like the most exciting topic, “gain staging” is one of the most overlooked, simple, and SUPER-IMPORTANT concepts of getting the best from your mix…
Once understood and implemented, it can take your mixes to the next level, giving them more clarity, punch and loudness.
(If you already know about gain staging and want to jump straight to the action steps, click here).
What is gain staging, and why should you care?
In a nutshell, gain staging is simply ensuring that an audio signal is at an optimum level from one stage to the next in the signal path, giving your sounds enough room to breathe and maximise dynamic impact.
Here’s an example: Your drum sample is set at the best level to go into a plugin (like a compressor or EQ), which is set at the correct level to go into the mix channel, which is set at the correct level to go into the master buss. Simple! But that begs the question, what are the best levels to use for your audio when gain staging?
(If any terms or phrases are unfamiliar, you can see The Ultimate EDM Production Glossary here)
When I started making EDM, I’d mix everything as loudly as possible – even using limiters on each separate channel(!) – because I wanted it to sound “fat”. It makes sense, right? I wanted my kick drum to sound as loud as Deadmau5’s, so I’d start from there – get the kick as loud as possible – and the rest is easy, right?
WRONG! Oh, how wrong I was…
It turns out that recording and mixing at high levels actually makes your final mix QUIETER (not to mention muddy and/or distorted). Read on, and I’ll show you how to overcome this problem once and for all…
This is primarily due to a lack of what is known as “headroom”, but what is headroom, and why is it important?

Don’t let this happen to your mix…
Headroom
Headroom is simply the name for the amount of available gain you have between your current audio level and the maximum level your system can reach before distorting.
This maximum level is called “0dBFS” (which stands for “0 decibels full scale”) and your audio will distort at this level.
The master channel (aka “master buss”) in your DAW will have numbers displayed next to it, and these show the peak level of your audio in relation to 0dBFS. It’ll look something like this:

(In Ableton Live, the brighter green bars display the average level – RMS – and the darker green the peak level).
So, if your audio level is peaking at -10dBFS, you have 10dB of headroom. The nearer you are to 0dBFS, the less headroom you have.
Headroom is important as it allows the music to “breathe”; to have more dynamic range and not put such a strain on the system. It effectively provides a buffer zone to accommodate unexpected transients or loud sounds without risking clipping (unwanted distortion).
In the analogue days, engineers would record at higher levels to avoid having an audible “hiss” in the background (which came from the analogue circuitry inherent in the equipment), but in this digital era of DAWs there is no such noise problem. For some reason, this practise of recording at higher levels seems to have stuck around, but as we don’t have those same noise issues with digital recording, we can afford to mix at much lower levels and avoid using all our available headroom.
ACTION STEPS: So what levels should you record, produce and mix at?
Below are some gain staging action steps you can implement in YOUR tracks straight away. We’ll go through a standard audio signal path in reverse – from the end to the beginning – because if we know our goal, it will help inform the previous gain staging steps:
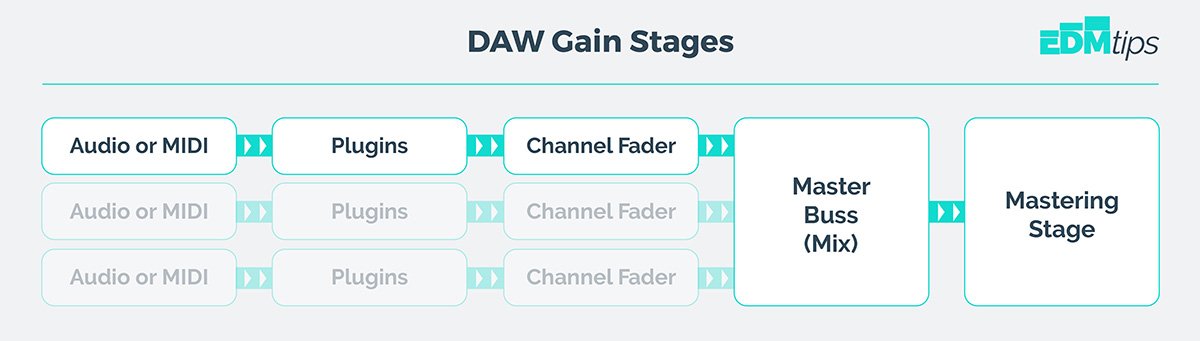
5. MASTERING STAGE:
When a track is mastered, the audio level will be increased to 0dBFS (or fractionally below to avoid distortion) – typically using compression and limiting plugins. This means we need to use a much quieter audio signal (with plenty of headroom) at the beginning of the mastering chain to avoid crushing the dynamics, or causing distortion.
4. MASTER BUSS (MIX):
You should aim for your pre-master mix to hover at about -18dBFS average, with peaks of around -10dBFS. These figures aren’t exact – and some DAWS meter levels slightly differently – but it’s a good, safe level to aim for. If you mix is sounding a bit quiet, don’t be tempted to turn up the master fader (leave it in default position); just turn up your monitors or headphones. Why -18dBFS? Well, it’s the equivalent of 0dBVU on analogue equipment. That’s the level that every engineer would aim for when recording – averaging around 0dBVU with the peaks going a bit higher.
3. CHANNEL FADER:
When working with audio (as opposed to MIDI), most DAWS will allow you to change the gain of a clip before any other signal processing. Alternatively (and also with MIDI channels), simply add a gain or trim plugin on each channel at the very beginning of the plugin chain. Adjust the level so the signal for that channel is peaking at about -18dBFS. In electronic dance music (or even pop or rock), the loudest sounds will generally be the kick and the snare, so If you set the gains for these first and mix everything else relative to them, you should avoid any problems.
2. PLUGINS – THE SWEET-SPOT:
Similar to above, make sure the audio level is about -18dBFS BEFORE it enters each plugin. You can usually do this with the plugin’s native input control. If your plugin doesn’t have I/O gain controls – no problem – simply use a separate gain or trim plugin before-hand. This will avoid the plugins getting pushed too hard and will render the best results. For every plugin you add, you’ll need to check that you aren’t increasing or decreasing the level of the channel. If you are, simply adjust accordingly, e.g. Applying heavy EQ cuts will decrease the level of a channel, so to compensate you can raise the output gain.
Pro EDMtip: This is also important to take into account when referencing plugins. If something is louder, it generally sounds better – which can be misleading. To make sure you’re actually improving the sound with a plugin (not just making it louder) make sure you’ve set the gain controls so the audio is at the same level when the plugin is activated as when it’s bypassed.
1. AUDIO OR MIDI:
Your audio clip or MIDI instrument should output at – you guessed it – about -18dBFS. But what if you’re recording vocals or an instrument through a microphone? Well, this is too broad a subject to cover in this post, but basically – as with the other stages (and for the same reasons) – try to record the average level as -18dBFS with peaks up to about -10dBFS.
Bonus question answered:
“What if I like my mix, but the master channel is peaking too high?”
If you like the balance of levels you have in your mix (but they’re peaking too high in your master channel) simply group select the individual faders and bring them down (leaving your master fader on 0db). IMPORTANT: This is why I strongly recommend any volume automation takes place BEFORE the mixer channel, e.g. with a gain plugin. Automated mixer levels will make tweaking your mix much harder than it needs to be!
And there you have it! Why (and how) to gain-stage properly and breathe life into your mixes.
What do you think of these tips? Have you got any hidden mixing weapons? Let me know in the comments!
Will
