Unless you are an outboard gear enthusiast, that whirring slab of silicon and circuitry that drives your DAW is an all-in-one studio. A true marvel of engineering, and nowadays arguably all one needs to make earth shattering, dance floor ripping EDM drops and builds – provided you have a little knowhow and the focus!
With that in mind, you feel compelled to have the best, right? Maybe just a few more CPU cores and an extra stick or two of RAM will really make people go nuts on the dancefloor?
 What if that’s not really the case?
Many blogs talk about ‘the best computer for audio production’. A far more interesting question is ‘what is the best laptop for music production for under $300?’ leaving some green to invest in knowledge and learning curve acceleration.
And financial resources aside, it’s worth thinking about how to get the most out of your hardware. Many of these tips are good practice to make the most of that CPU – whether it’s cutting edge or dragging edge.
So, now you’ve made it past the ranting intro, let’s get into some tips (and a little benchmarking) on how to take a run of the mill computer (or a dedicated audio crunching beast) and squeeze the most from it.
Setup your operating system properly
- We are going to make a few backend changes here, so before tinkering around its always worth taking a full backup of your OS by creating a ‘restore point’ in Windows, or use Time Machine on your Mac.
- Disable all unnecessary background programs. In Windows this is as simple as going into Task Manager (the fabled CTRL+ALT+DELETE) and either disabling them from start up for good, or just killing them for your session. If you are on a Mac, use Force Quit (COMMAND + OPTION + ESC) and right click to close them down.
- Remove any bloatware or crapware. A little spring cleaning of your programs (head to Add or Remove Programs in Windows, or satisfyingly drag those programs to the bin on a Mac) can help to alleviate a little unnecessary RAM usage.
- Ensure your internal hard disk has plenty of space. Ie. more than 20% free at all times, even after you’ve stuffed it full of sample packs and other goodies.
- Plug it into the wall. It sounds basic, but running your laptop plugged in is a must. The first thing your OS is going to do is to throttle the CPU to balance battery life, so get used to always carrying that fugly power supply around with you.
- Next, sort out any potential CPU throttling due to power saver modes. For Windows, head to your power settings (type ‘power’ in the search bar) and check that a ‘High Performance’ plan is enabled. You may need to click on ‘advanced power settings’ -> expand ‘Maximum processor state’, and check it is set to 100%.For Mac, double check ‘Energy Saver‘ settings are off in System Preferences by setting ‘Turn display off after’ to ‘Never’ and unchecking ‘Put hard disks to sleep when possible’.
Note: some laptops also have their own hardware control centre software that enables a touch of mild ‘stable’ overclocking. If yours does, see if there is a turbo boost, high performance or gaming mode to safely squeeze just a little more out of that CPU.
- If you don’t mind everything looking a little basic (old school?) you can adjust your appearance settings for maximum performance to squeeze out another smidge of CPU capacity. Type ‘adjust the appearance’ in the Windows search bar and set to ‘Adjust for best performance’. Fonts will now be a little headache inducing, so recheck ‘Smooth edges of screen fonts’.For Mac, head to ‘System Preferences’, then ‘Dock’ and uncheck “Animate opening applications”, uncheck “Automatically hide and show the dock” and change Minimise Windows from ‘Genie effect’ to ‘Scale effect’.
- Now, it’s time to help facilitate a little sacred DAW time by turning off notifications. They can rob a little CPU at just the wrong time, and not to mention they are straight up annoying. If running Windows, turn off notifications (type notifications in the Windows search bar, or for Mac flick on Do Not Disturb Mode in the Control Centre).
- Turn off your Wifi connection – you may need to start up your DAW and project file first to get all the software authentications out of the way, then flick off that Wifi (or AirPort for Mac). Its good practice anyway to help cultivate that laser focus on your session and avoid going down the rabbit hole on another Youtube tutorial on kicks.
- Lastly, now that you are cut off from the outside world, disable any firewall and antivirus programs you may be running. Some are notoriously resource hungry and can sometimes interfere with plugins.
Setup your DAW

1. Setup your audio interface (or internal sound card) properly by plugging it directly into your computer’s USB port (avoid USB hubs). For Windows, select an ASIO sound driver in your DAW audio settings (note, ASIO is far superior to MME/DirectX). If your interface doesn’t offer an ASIO driver, ASIO4ALL is a decent (and free!) option to go with. For Macs, you don’t have to worry about ASIO as the inbuilt CoreAudio drivers are top notch.
Next, check the sampling frequency in your DAW audio settings matches that of the audio setting in your operating system (ie. check your sampling frequency in your Windows Control Panel or Mac System Settings). Any mismatch is an extra load on your CPU as your system reconciles the difference before sending the output to your ears.
2. Set yourself a calendar reminder, say every couple of months to check for audio driver updates. Behind every driver update is a team of coders looking to improve sound quality and stability. Make sure you take advantage of their hard work.
3. Increasing playback buffer length (latency) in your DAW’s audio settings will have a profound CPU benefit at the expense of a mild delay to the sound waves hitting your ears. Aim for 512 for a midrange computer, or 1024 if running a budget laptop.
Having said that, if you are planning on playing live gigs or running outboard gear, latency is a key consideration, and perhaps a budget laptop is not a great idea!
Also, note that latency won’t be translated to waveforms when rendering, as the CPU has all the time it needs to crunch down the audio file(s).
When recording, don’t forget to reduce latency to help capture those takes in time, and not put yourself or your musician off through an excessively delayed monitor signal. Some DAWs and Mics have a ’direct monitoring’ option to provide zero latency to hear your recording in real time. Try googling for your DAW to see if this is an option.
4. You may already have collection of synth plugins (Serum, Kontakt, Arturia, etc.) in your arsenal, which can really hammer that CPU. Take a little time to learn which ones are the most resource hungry, so you can optimise your workflow to anticipate which ones may tip your system over the edge. Consider organising your plugins or bookmarking them so that you know which ones need a little extra care, and which are quicker to throw on a channel and play around with.
Develop your workflow to maximise your hardware

1. Get into the habit of committing those CPU hungry synths to audio. Bouncing tracks down not only to maximises your hardware, but also helps build discipline from a creativity perspective. Nothing fosters efficient production like crafting a sound, then moving on by committing to audio.
2. Use the Freeze, Consolidate or ‘Bounce In Place’ feature in your DAW. It’s called various things in the most popular DAWs (Ableton, Logic, FL Studio), but all effectively provide the same functionality to render a MIDI track to a ‘reversible audio file’, enabling you to temporarily free up CPU resources without having to fully commit to audio.
3. Delineate your production and mixing sessions by bouncing all your tracks to audio stems before getting stuck into the mixing stage. This also builds discipline by separating your production workflow from your mixing workflow. But more importantly, it frees up important CPU resources to then load up tracks with more mixing focused plugins.
If you’re interested in more music production workflow tips, check out my other blog post on Music Production Workflow Tips For Getting More Music Finished) here.
Benchmarking a ‘Laposaurus’
 If the yardstick is a $300 laptop for audio production that meets Ableton Live 11 minimum system requirements (i5 dual core or equivalent and 8GB RAM), there are plenty of options that can do the job. Fortunately to lend this blog some credibility, a bit of rummaging around in the home junk drawer yielded an unloved, but very much capable HP Spectre x360 that had been living its life as the family café nanny. And as we can see by the specs it just scraped over the Ableton line.
CPU: Intel Core i5-5200U 2-core 2.2 Ghz
8GB RAM (2 x 4GB @ 1600 Mhz)
1TB SSD HD drive 500Mb/s (I’d upgraded from 256Gb many years ago)
13.3’’ screen – a little too small for comfort but fine when plugged into a monitor
After untangling the power supply, I took a reference point with Userbenchmark straight out of the drawer so we have a baseline to test what said blog tips can really deliver.
The benchmark revealed a sad 38% performance rating for ‘General Desktop’ use, and 6% for ‘Workstation’ (Userbenchmark’s overall roll up performance metric). After tuning it up, the benchmark indicated a hopeful 58% for ‘General Desktop’ use, and 9% for ‘Workstation’. Which in relative terms, was a whopping 50% increase in performance!
Next, I used Serum as a proxy for CPU hungry plugins to see how performance translated to the DAW. I created a stress test Serum preset with 16 poly and 8 unison on both Osc A and Osc B, all of the FX turned on and overlaid two 7th chords to play at the same time (total of 8 notes), loading this onto a single channel and deleting all other channels. I also set latency to 512.
The Spectre only managed to handle a clean single channel of this CPU assaulting preset, with another channel pushing Ableton’s CPU meter to 100%.
I then created another Serum preset indicative of more regular use, with 16 poly, 4 unison on Osc A and 4 unison on Osc B, and just three FX, also again triggering two chords to play at the same time. This time I managed to play 3 clean channels before hitting the 100% CPU mark. Much better! And very useable with a CPU conscious workflow.
On top of it, I opened several mixing projects running up to 20 processing plugin loaded audio tracks, and was able to play them cleanly, maxing out at about 80% on CPU.
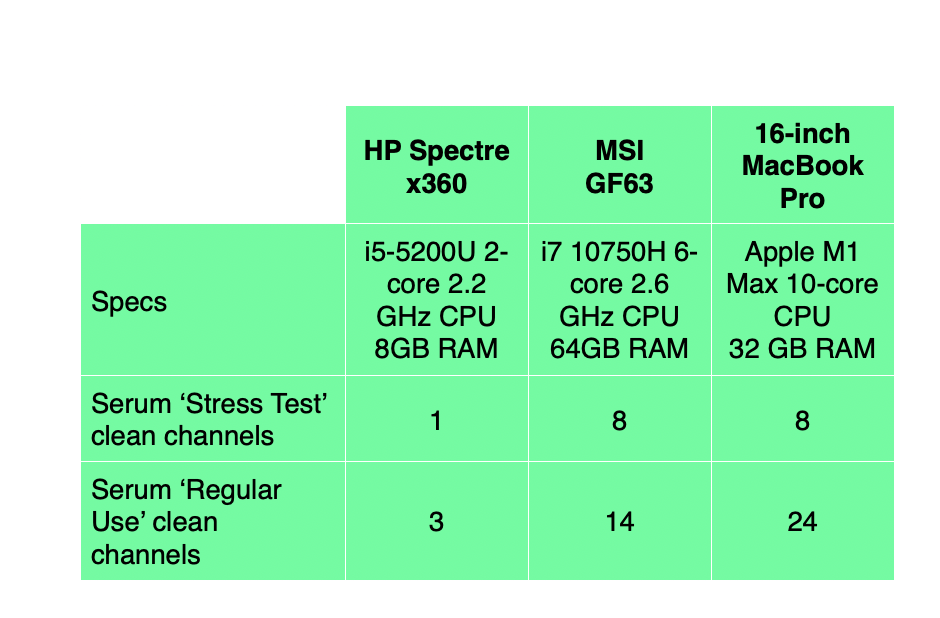
For comparison, as a medium range computer benchmark, the same Serum test was carried out on a spec’d out MSI GF63 gaming laptop (i7 10750H 6-core 2.6 GHz CPU, 64Gb RAM), which achieved 8 clean ‘stress test’ Serum channels, and 14 clean ‘regular use’ channels.
Then lastly, for all the Mac users and covering off on the range end of the spectrum, the same test was run on a 16-inch MacBook Pro (Apple M1 Max 10-core CPU, 32 GB RAM) and achieved 8 clean stress test Serum channels, and 24 clean regular use channels.
For those that couldn’t make it through the slabs of text, here’s a table:
…and if you have Serum and want to do your own benchmarking, grab a copy of the Serum Presets by entering your email address below and see how many channels you can squeeze out. Give it a go and throw some comments below with your specs and how you went 😊
Conclusions!
- Spend a little time setting up your computer properly within the settings of both your operating system and DAW.
- Learn how to craft your workflow to make the most of your CPU.
- You don’t need to drop a load of cash on the latest computer to make wicked EDM. With the right settings and DAW workflow, even old gear like a Spectre x360 can be a very capable music making machine.
