If you produce or mix your own music and you don’t properly understand or implement gain staging, you could be ruining your mixes. In this article we will uncover seven gain staging mistakes that almost all producers make – and how to fix them.
Trust me, implementing these techniques will get your music sounding instantly better.
Before I knew about gain staging, I was banging my head on the wall, thinking why isn’t my music sounding as good as my favorite producers. Gain staging can instantly elevate your music to a new level, and that’s what you’re going to learn in this article.
Firstly, let’s quickly explore what difference gain staging actually makes?
Let’s listen to some examples to understand the benefits of gain staging.
So, let’s listen to the track that hasn’t been gain staged properly. It’s distorted, everything’s a bit muddy:
and compare it to the same track when the gain staging is done properly:
It’s still loud and punchy, right? But there’s clarity and there’s dynamics in the mix. And that’s exactly why gain staging is so important to understand.
Now let’s explore the top 7 gain staging improvements that you can start implementing in your music production projects today.
1. Ignoring Gain Staging (or not understanding it)
The first mistake that most producers make is not understanding gain staging properly or just ignoring it all together.
Let’s quickly touch upon what gain staging is.
Gain staging means being aware of the level of your signal of every single track in your mix at every single stage of the processing.
So if it goes from one plugin into another, what level of volume should it be at when it’s going into that next plugin, what level of volume should it be at when it hits your channel fader, hits your group bus and ultimately your master bus. It’s that simple.
Ignoring that can give you terrible results. And it doesn’t matter if you are mixing within your production session or whether you’ve actually got bounced down stems, gain staging is super important for both.
And once again, it doesn’t matter whichever DAW you’re using, whether you are using Ableton logic, FL studio, studio one or Cubase, and it doesn’t matter which genre of music you are creating as well.
Ultimately, we want to make sure that we’ve got enough headroom. That means space before we hit the clipping level, when things start to go a bit distorted. And ultimately when all our tracks are playing together, we want our master channel to be peaking at about minus six.
Gain staging is important for two main reasons.
- We want to avoid unwanted clipping everywhere in our signal path, throughout the whole process to make sure we don’t have any unwanted distortion.
- The second reason is if you are using analog model plugins, that is plugins that are created to mimic a real life piece of audio equipment. They operate best when the level of volume going into them hits a sweet spot.
2. Not Setting Your Initial Levels
Let’s go on to mistake number two, which is not setting your initial levels.
The first stage of knowing how to set your levels is to understand the difference between peak volume and average volume.
Average volume = volume that the signal has over a period of time.
Peak volume = short, sharp, specific peaks on their own.
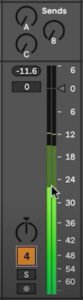
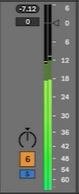
The dark volume meter represents peak volume, and the light green meter is the average volume. And you can see it’s actually a bit lower than the peak volume which is always the case.
On this particular Drum channel you can see it’s peaking at about minus 12. And our average volume is about minus 28, minus 26.
Start by putting all of your channel volume faders to zero.
Then add the Utility plugin in Ableton, other DAWs it’s called Trim plugin.
The sweet spot for average volume to aim for is -18Db, and that’s where the Utility plugin comes into play.

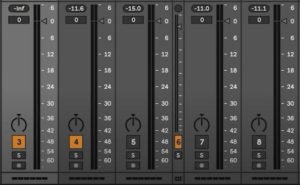
Copy the utility plugin onto every channel and adjust the gain on the utility plugin aiming for all channels to hit -18Db average volume.
Once you’ve done that and are seeing everything is averaging at about minus 18, you might see that there’s clipping on the master channel. That’s not a problem and you’ll see why later in this article, but these are the ideal levels to get your mix started with because all of these sounds when they go into an analog model plugin will be hitting that sweet spot.
3. Super Low Faders
To continue on from mistake number two, when you’ve got your levels set to zero obviously you will have to turn some of the instruments down because of clipping on the master channel.
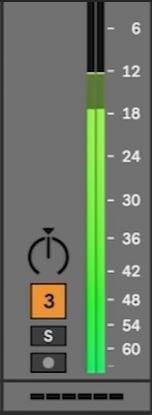
You might want a percussion or string element, for example, to be really low in the mix which is absolutely fine. If you look at the scale here on the fader, it’s not linear, it’s logarithmic.

Trying to mix using the channel fader lower down the scale is tough because it’s a much lower resolution and range to play with. So the way to get around that issue is you can have another gain plugin after you’ve got the initial setting gain plugin, and that can attenuate the volume. Therefore allowing you to mix with the channel volume faders at the top range, more around the 0 to 12 range.
Remember to set the second gain plugin at the end of the chain of plugins. In this example put each of the plugins in between these two utilities.
This is not essential, but does give you way more range and volume control when mixing using the volume faders at the top of the range, as opposed to way lower down the channel fader range.
4. Clipping on the Busses
So we’ve got each of our separate channels and they’re not clipping and they’re hitting minus 18. Fantastic!
But what you might find is when you’ve grouped your individual channels into a bus channel, we want the Bus channel to be also hitting the sweet spot.
Simply resolve any issues with the Bus channels being higher or lower than the minus 18 rule by putting a utility plugin at the beginning of that group level. From there you can adjust the gain accordingly.

So once the group channel is hitting minus 18 there as well you’ll notice that the fader is still up around zero. So now you’ve got all that control to start mixing at groups also.
5. Not Gain Staging between Separate Plugins
This is really important because some plugins will add or decrease volume and then it’s very hard to hear when you are A/B testing and bypassing them on and off the difference that they’re making.
Also an important point here is the fact that the signal won’t be going into the next plugin in the chain at the sweet spot of minus 18. So we kind of want to maintain that minus 18 average volume throughout the whole signal pass, so we’re getting the best results at every step of the process.
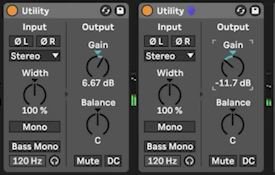
An example of how to do this is to add an FX plugin, e.g. Thickify, and then add some settings to get the desired effect such as Drive or Tone.
What you’ll notice if you toggle the plugin on and off is that the audio volume is louder with the plugin on. In order to gain stage, use the gain control on Thickify to reduce the volume to match minus 18 or thereabouts.

You can also use and add another Utility gain plugin after the FX plugin to achieve the same results. Group the FX plugin and Utility to allow for A/B testing quickly at the click of a button.

6. Not Creating Gain Structure Templates
So if I’m producing, I will already have certain volumes programmed in, for example I will have about minus 10 to peak on the kick drum, because I know it’s going to be averaging at about minus 18. However if you are using audio stems and are bringing them into a completely fresh mixing project there are a few things you can do to save yourself a lot of time.
- The first is to simply copy and paste a utility gain plugin on every single channel that you bring into the mix.
- The next is just to make sure your master fader is left at zero because ultimately we want our mix to be peaking at about minus six. And if we move this fader, it’s going to confuse things.
- And the last thing as we’ve already touched upon is to make sure that any group processing we do is also gain staged and that we have a utility plugin there to make sure that our busses are averaging at about minus 18 as well.
7. Obsessing Over Gain Staging
I get this every couple of weeks for my students in my Music Production Accelerator, and that is obsessing over gain staging.
The number minus 18, isn’t an absolute science. It doesn’t matter if you are up and down a bit. You don’t need to invest in fancy VU meter plugins to measure the average volume, especially when DAWs have built in average volume measurement nowadays as well.
So with Ableton, for example, we could see there are these two different levels, the dark green, the light green, you can just do it by eye.
You don’t need to be hitting exactly minus 18 but need to be hitting roughly somewhere around that.
There are three things you always need to be aware of is:
- you are not clipping anywhere within the signal path.
- you are hitting the sweet spot when you are going into your analog model plugins.
- whenever you are putting a plugin on, just make sure you are gain staging afterwards in the chain. Main reason here is to give yourself a fair comparison of the effect that that plugin is having (e.g. when A/B testing) and also it’s going into the next plugin at the sweet spot.
Here is the video version of this tutorial: https://www.youtube.com/watch?v=pvqIqoGVl6w&t=0
